Nail OB's and spoil your co-host with Myriad Playout Remote 

Liam Burke • March 15, 2019

And the best bit is it is free for Myriad 5 Playout customers!

A computer screen shows the time as 1:35

Myriad 5 Playout Remote is a really useful utility that not many people know about. It is a light weight application that can connect to a studio playout system and provide real time information and control over Myriad 5 Playout.

There are two main use cases for Myriad Playout Remote:

  • Add a second info & control screen in a studio for a co-host or for presenters in a talks studio.
  • Add real time playout info and control at a remote site (such as an outside broadcast).
Myriad Playout Remote (or just Remote for the rest of this blog!) is a cut down information and control application that connects to and can control a full Myriad Playout system in your studio. It doesn't play any audio itself and doesn't have all the features of Myriad Playout but it does offer a really useful set of features and because it uses a very compact data connection, it can be used to control your studio over fairly low bandwidth data connections.

Remote needs to be connected to an active and fully licensed copy of Myriad in your studio. It also needs to be on the same network which should be no problem for Remotes in your studio but will require a VPN connection for OB's.

So what can you do?

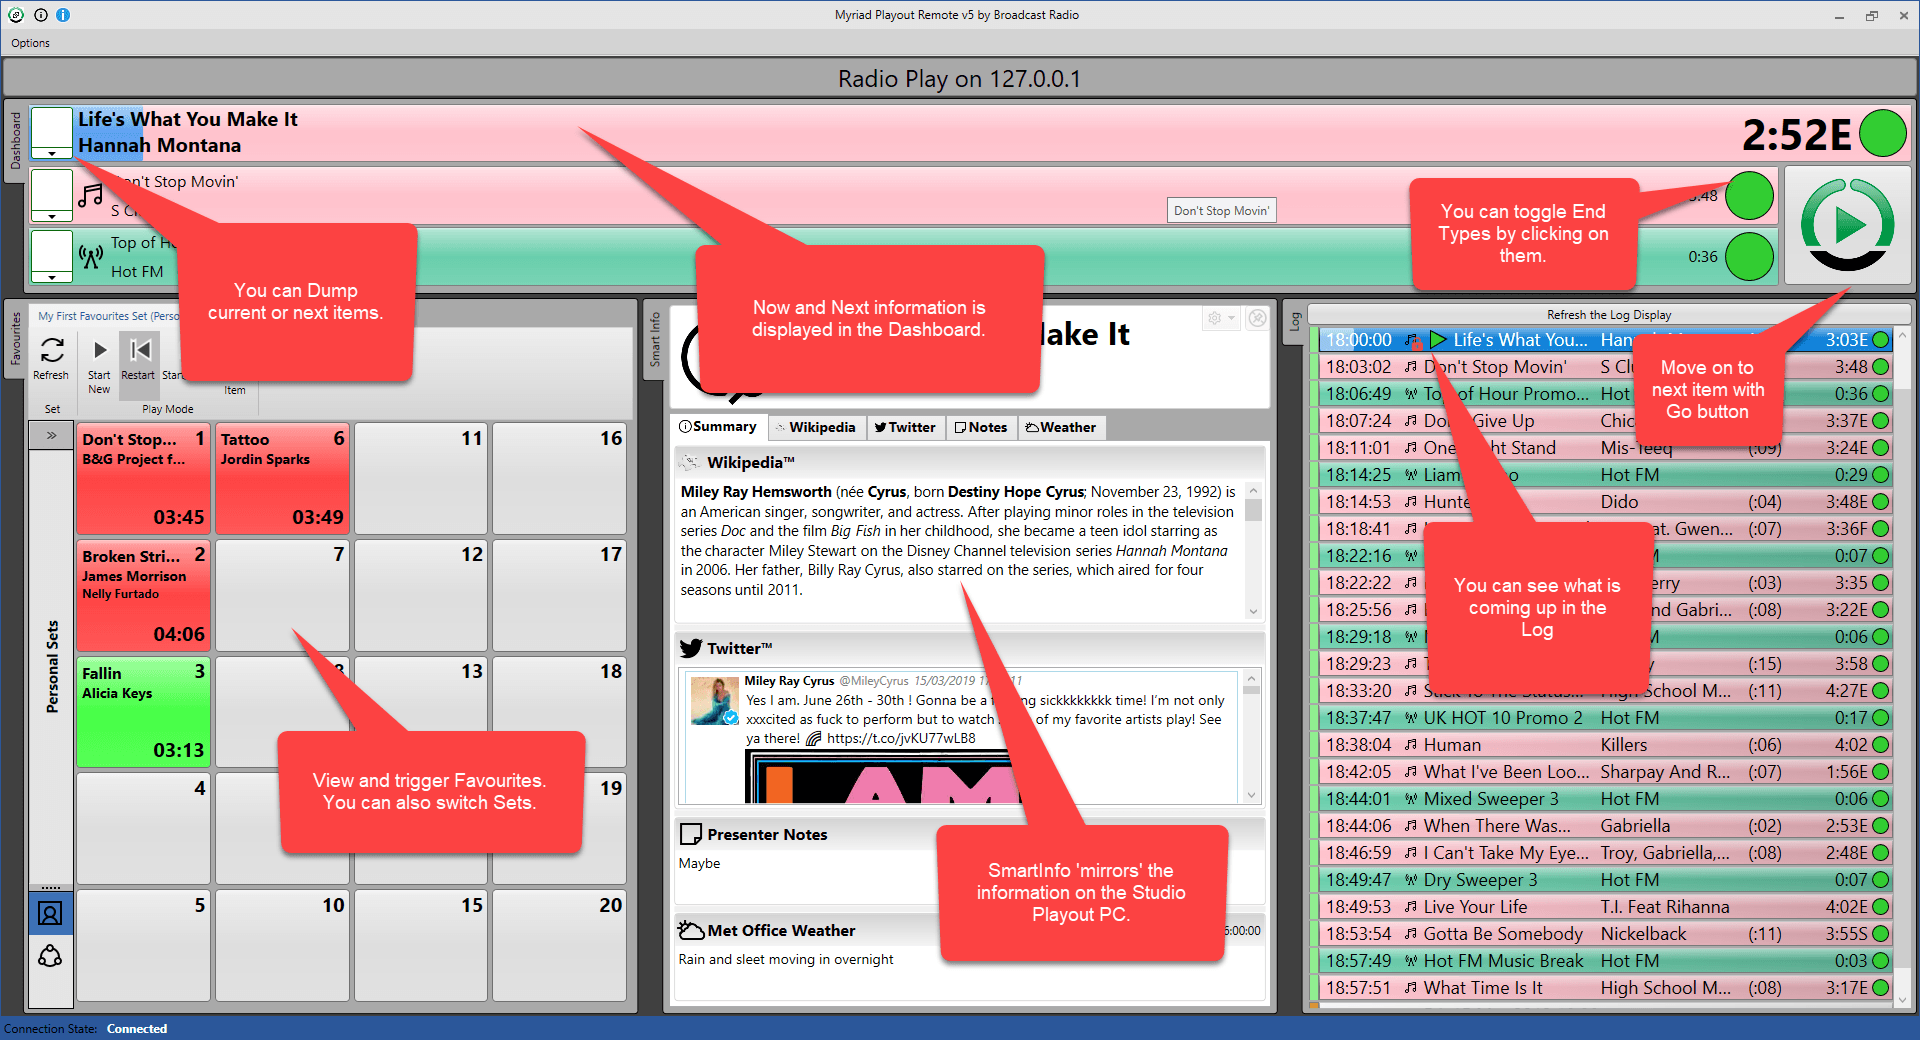
Remote allows you to view what is happening on Playout in real time as well as control certain aspects of the system.

The fey features include:

  • View & Play Favourites (and switch Sets)
  • View the a 'mirror' of the studio Smart Info tile
  • View items coming up on the Log
  • View the Dashboard (including current item play progress)
  • Control the Dashboard (Including Go, Dump and Change End Type)
  • Switch Playout Modes (Live or AutoFade)

How do you set it up?

Setting up Remote is actually very simple and once configured, you can install Remote on as many PC's as you like (but only one can connect at any one time to a single Playout license).

Here is what you need to do.

First you need to download and install the Myriad Playout Remote software.

https://www.broadcastradio.com/myriad-5-playout-support#Download

Click on the link above to go to the Myriad 5 Support page and click on the button to download the latest full release.

A purple button that says current full release on it

This will open a popup window to allow you to select the software you want. Scroll down and click on the Myriad Playout Remote option.

A screenshot of myriad remote edit with a microphone in the background

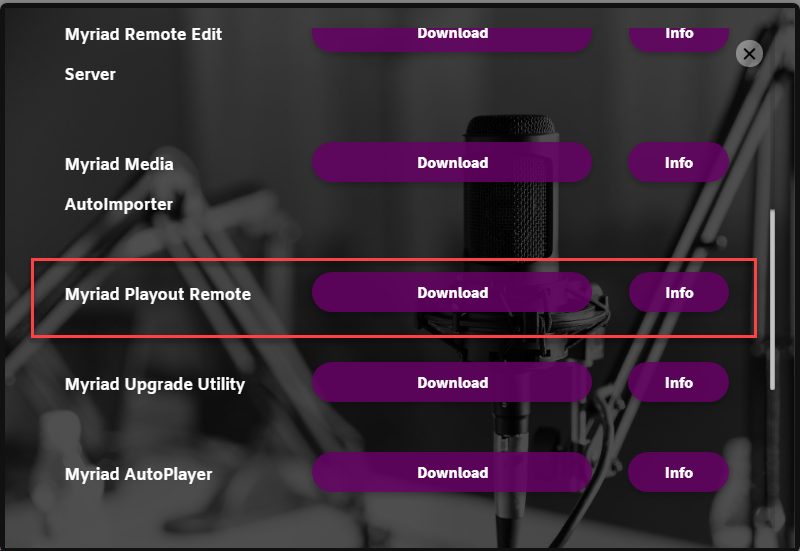
Once downloaded, run the installer and follow the normal process. There are no questions so it should be very straight forward.

A screenshot of the myriad playout remote installation wizard

Once the install has finished, Myriad Playout Remote is ready to go but we also need to make some changes in Myriad Playout to allow it to connect and control the system (this is off by default!).

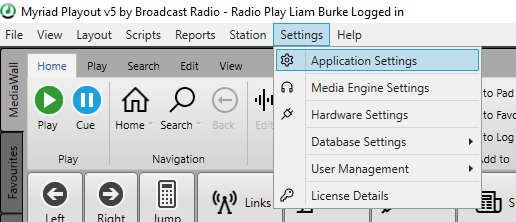
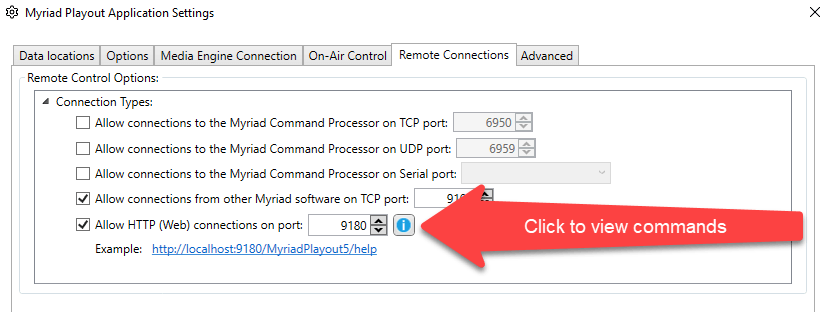
In Myriad 5 Playout, go to the Settings Menu and select Application Settings.

A screenshot of mymad playout v5 by broadcast radio

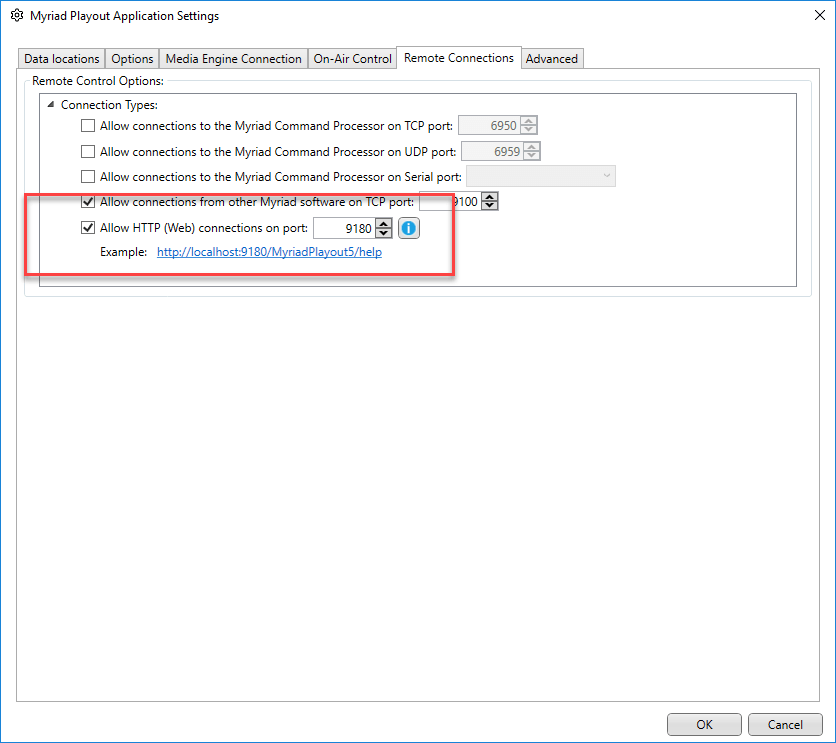
Next switch to the Remote Connections tab and tick the Allow HTTP (Web) Connections option. You can leave the port on the default setting (9180) unless you need to have multiple Remotes connecting to different studios on the same network.

A screenshot of a remote connection settings window.

Now here is a tricky bit!

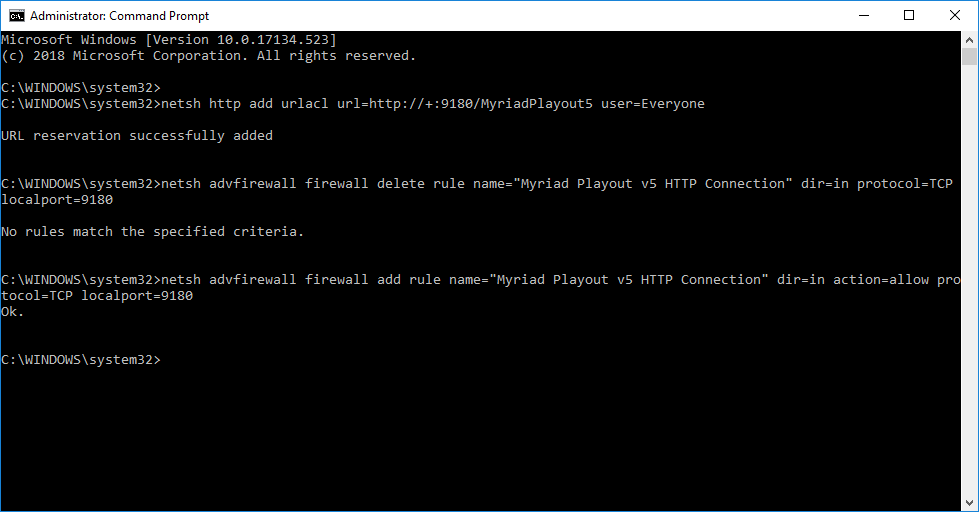
You need to allow the Playout and Remote to talk to each other on your network by changing some setting using a few special commands typed into an 'elevated' command prompt.

***Important Step***

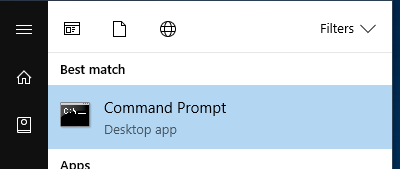
Click on the Windows Start button and type CMD on your keyboard. When you see the CMD option, Right Click and select Run As Administrator.

A screenshot of the command prompt window on a computer.

You will probably have to confirm that you want to proceed as an Admin, do so and you should see a black command prompt window.

First paste the following line in and hit <return>

netsh http add urlacl url= http://+:9180/MyriadPlayout5 user=Everyone

Next do the same for this line:

netsh advfirewall firewall delete rule name="Myriad Playout v5 HTTP Connection" dir=in protocol=TCP localport=9180

Finally repeat with this line:

netsh advfirewall firewall add rule name="Myriad Playout v5 HTTP Connection" dir=in action=allow protocol=TCP localport=9180

In each case change the Port number to match the setting in Myriad Playout if you changed it earlier.

Once you have done, it should look like the image below. Don't worry if you have any that return what appears to be an error as the sequence is designed to clear and reset certain settings that may not always be applicable.

A computer screen with a lot of text on it

You can access these commands directly by clicking on the ' i ' button on the Remote Connections tab.

A computer screen with a red arrow pointing to a button that says click to view commands

With that all done, you need to restart Myriad Playout for the settings to take effect.

Now we can run Myriad Playout Remote.

A computer screen that says ' not connected to ' on it

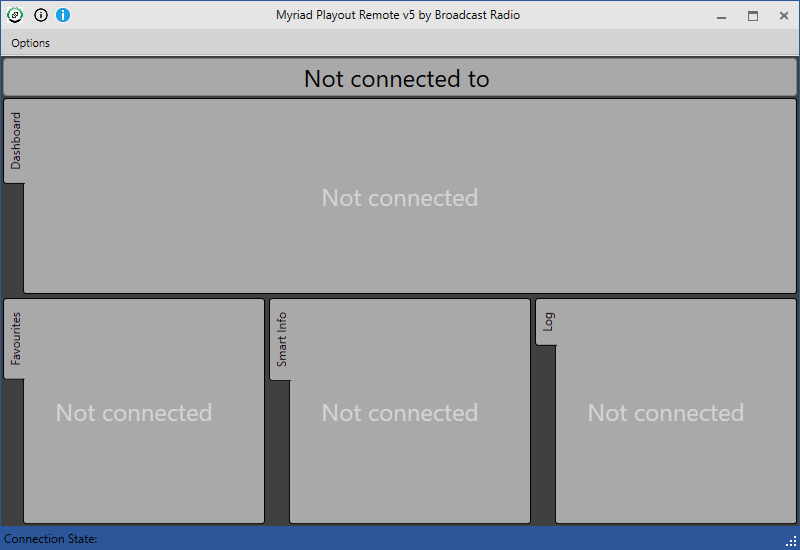
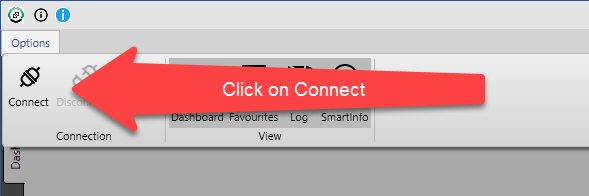
Initially Remote will look like the shot above because it is not connected to a Myriad Playout system. Click on the Options menu  option and select Settings. 

A computer screen shows the connection settings window

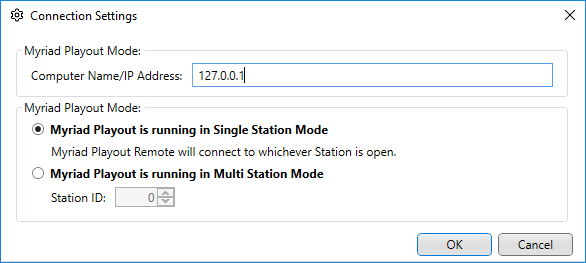
You need to add in the Computer Name or IP Address of the PC that is running Playout, then click on OK to close the settings window.

Finally, click on the Connect  button on the Options Ribbon.

A computer screen with a red arrow pointing to the click on connect button.

Your Myriad Remote application should now be connected and ready to rock!

A computer screen shows a calendar and a facebook page

Let us know how you get on.

By Liam Burke October 27, 2025
Ideal for Myriad Playout (on premise) users.
By Liam Burke October 27, 2025
In this post we will run through how to create a new Station under the Kelfield Radio ‘Brand’ within Myriad Cloud. This assumes that your primary radio station is also on Myriad Cloud. Don’t worry if your primary station is a traditional ‘on premise’ Myriad Playout 6 system, we will be covering how to setup from a traditional system in the next post. In this post, we will cover the steps needed to create a new Station within an existing ‘Brand’ running on Myriad Cloud, but before we start, it is worth mentioning how hierarchy of Organisations, Brands and Stations works in Myriad Cloud.
By Liam Burke October 27, 2025
Too early to start thinking about Christmas? You may not need to be baking Mince Pies just yet, but if you are thinking about running a festive pop-up radio station this holiday season, you may want to start planning for it now. Over the next few weeks, we are going to guide you through the process of building a fictional festive station called Santa Baby Radio, using the Myriad Cloud platform. This station will be a spin off from the equally fictional Kelfield Radio often featured in our demos and tutorial videos. In this series we will cover every step needed to setup, build and launch Santa Baby Radio using Myriad Cloud. This will include: * Creating a new Station within the Kelfield Radio brand which will share audio content with the parent station. * Use the Mass Change tools to only use the content we want on Santa Baby Radio, and fill in any gaps by uploading news songs and jingles. * Build some clocks and assign them to the weeks leading up to Christmas. * Setup AI Voice Links to add some special, context sensitive content that will make this fully automated service sound live. * Design and build a simple website and web player for the station. * Add in the details needed for the optional mobile apps (iOS, Android & Carplay) as well as an Alexa Skill. * Invite some presenters to voice track shows and even present a special live show on Christmas eve. * Launch the radio station and get started on the mince pies. We will cover these steps in posts released over the coming weeks, so check back regularly for the latest episode.
A digital clock displays the time as 10:08 am
By Liam Burke March 28, 2024
In anticipation of the release of SmartSign 3, we are looking back at the history of our screen studio signage system as well as a quick look at what the future holds. SmartSign 1 (well just SmartSign) was originally conceived as a simple ‘tally’ indicator to how real world events such as when microphones are active or a phone is ringing. At the time, we were working on the BR Hardware Service as part of the general Myriad 5 development cycle, and wanted a way to showcase the virtual hardware events the BR Hardware Service introduced. One of the aims was to make the system as cost effective as possible so work began on building an application that would run on Windows IOT on a Raspberry Pi. The Pi was ideal as it included physical hardware I/O built in meaning that SmartSign could use both physical and virtual GPIO and even convert physical inputs to virtual inputs for use in other BR software such as Myriad Logging or other SmartSigns.  We soon started to add other ‘tiles’ to the system to allow clocks, date / time, text, images, RSS feeds and more. SmartSign was released in 2016 and was an instant hit with our customers.
Artists Group Management
By Liam Burke March 27, 2024
Learn how to use Artist Groups to prevent Songs from associated Artists from scheduling close together.
A screenshot of purgatory fm showing a song by david jordan
By Peter Jarrett December 8, 2023
The latest feature from Broadcast Radio can really make your station stand out from the competition
A screenshot of a computer screen shows players 1 and 2
By Peter Jarrett May 12, 2023
Myriad v6 Public Beta testing has been going well... REALLY well!
A microphone and headphones sit on a desk in front of a computer monitor
By Liam Burke April 19, 2022
This smart microphone may be ideal for Myriad Anywhere users.
A microphone is sitting in front of a computer screen.
By Blanca Jonathan June 28, 2021
Image Source: Pexels
A black mixer with a lot of knobs and buttons
By Liam Burke February 26, 2021
We are often asked for recommendations for smaller, low cost mixers for stations that are launching on a tight budget or looking to add additional studio capacity as cost effectively as possible. Type 'stereo mixer' into Google and literally hundreds of options will come up but the vast majority of them are not really suitable for use with Myriad because they do not have enough stereo inputs, are designed for sound mixing or do not offer the basic facilities needed to present a radio show. But there are a few that could be considered as a possible alternative to a full broadcast mixer. The Behringer DX2000USB may be the ideal mixer for smaller stations, as long as they are willing to live the compromises it brings when used in a broadcast radio environment.