Let's get connected! - Using the BR Hardware Service to control external hardware and audio switchers
Learn how Myriad 5 can connect to the real world via the BR Hardware Service for controlling devices and external audio switchers.
We often get asked how Myriad 5 Playout can interact with real world devices using hardware input / output devices. Once you have a hardware I/O device configured, there are a number of great applications that can be used to automate processes in stations or make controlling the system easier.
Some common applications for Inputs
include:
- Fader / Channel Starts - You can use hardware triggers provided by your mixing desk to start and stop the Media Players in Myriad.
- Big Red Go Button - Similarly you can use a push button to trigger events such as Log Go.
- Onair Status - You can use logic from your studio switcher to control the 'On Air Control' in Myriad.
- Switch Dynamic Layout - How about some physical buttons to switch between layouts.
There are also many applications for Outputs including:
- Switching External Devices - The most common use for this is switching an external source (such as news) on and off at the top of the hour.
- Controlling On Air Switching - You can use the 'On Air Control' in Myriad to drive a suitable 'real world' studio switcher.
- Studio Signage - Have your studio signage show status events in Myriad Playout (if you have Smartsign this can all be done with Virtual Hardware Events so no cables needed!)
It is clear that you can do a lot with physical hardware I/O but the same system can also be used to create virtual hardware I/O interactions with supported devices such as Myriad 5 Logging, SmartSign and AEQ Mixers.
In this post we will explore how to initially setup the Hardware Service at your station and use it to control one of our Simple Audio Switcher units.
The Basic Concepts
In previous versions of Myriad, hardware I/O support was built directly into the playout software which meant you were somewhat limited in functionality and required a different device per playout workstation. If you take the case of external news switching, that meant you often needed both a hardware I/O device plus an audio switching device for each studio or automation system that needed to be able to do the switching.
When we designed our fifth generation products (Myriad 5 Playout, Myriad 5 Logging, SmartSign) we had a grander vision for how hardware would work.
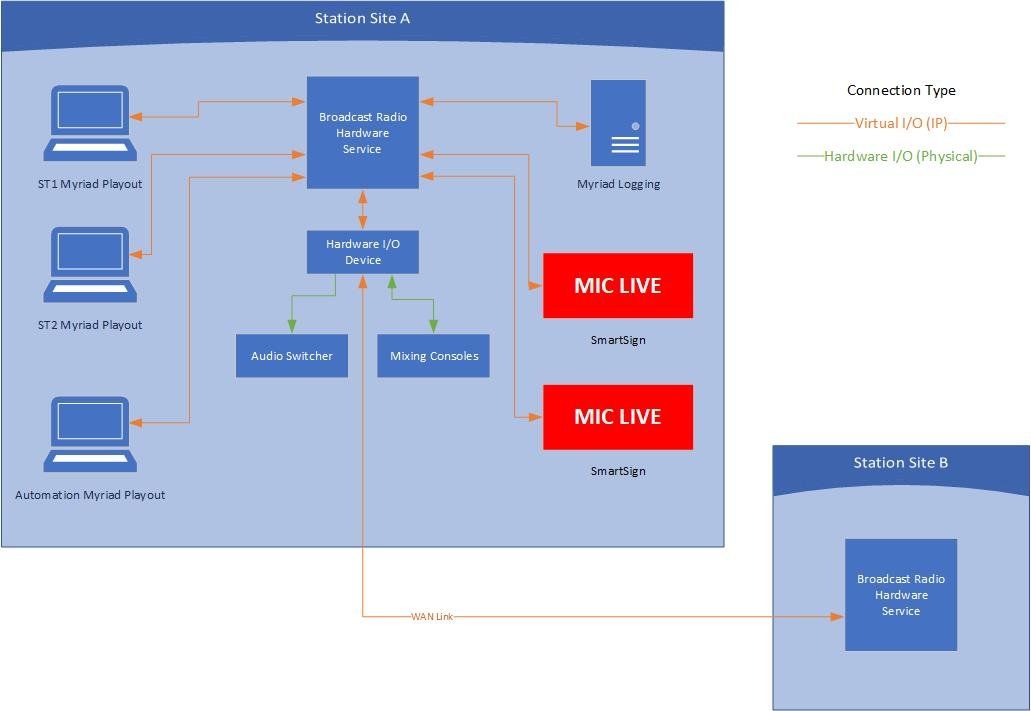
Take a look at the diagram above.
The basic premise is that instead of the Playout, Logging and SmartSigns handling hardware internally, we have a central Hardware Service that is responsible for interacting with the real world, and the individual software applications can connect to the Hardware Service (over your network) to either trigger or respond to hardware events using the
This has a number of advantages including:
- Centralised setup & admin
- Reduce hardware I/O devices (as lines can be shared between multiple studios etc)
- Reduced external equipment (no need for a switcher per studio for example)
- Easy expansion (add multiple SmartSigns that all subscribe to the same events)
- Reduced physical wiring (as most of it is IP)
- Share hardware I/O across sites (as it is IP driven, you can link Hardware Services across you group so you could have a central Myriad Logging system logging mic live events across all stations in you group!)
Getting Started
Now we know what the basic premise is, let's take a look at how to make it happen at your station. In this example we will walk through the process of setting up the Hardware Service to control a very simple audio switcher which could be used for switching on an external source such as news.
The steps we need to complete are:
- Install your Hardware Device
- Install the Broadcast Radio Hardware Service
- Configure the service to use hardware I/O devices
- Connect Myriad Playout to the hardware service
- Add in an event into the Log to switch on the device.
1. Install Your Hardware Device
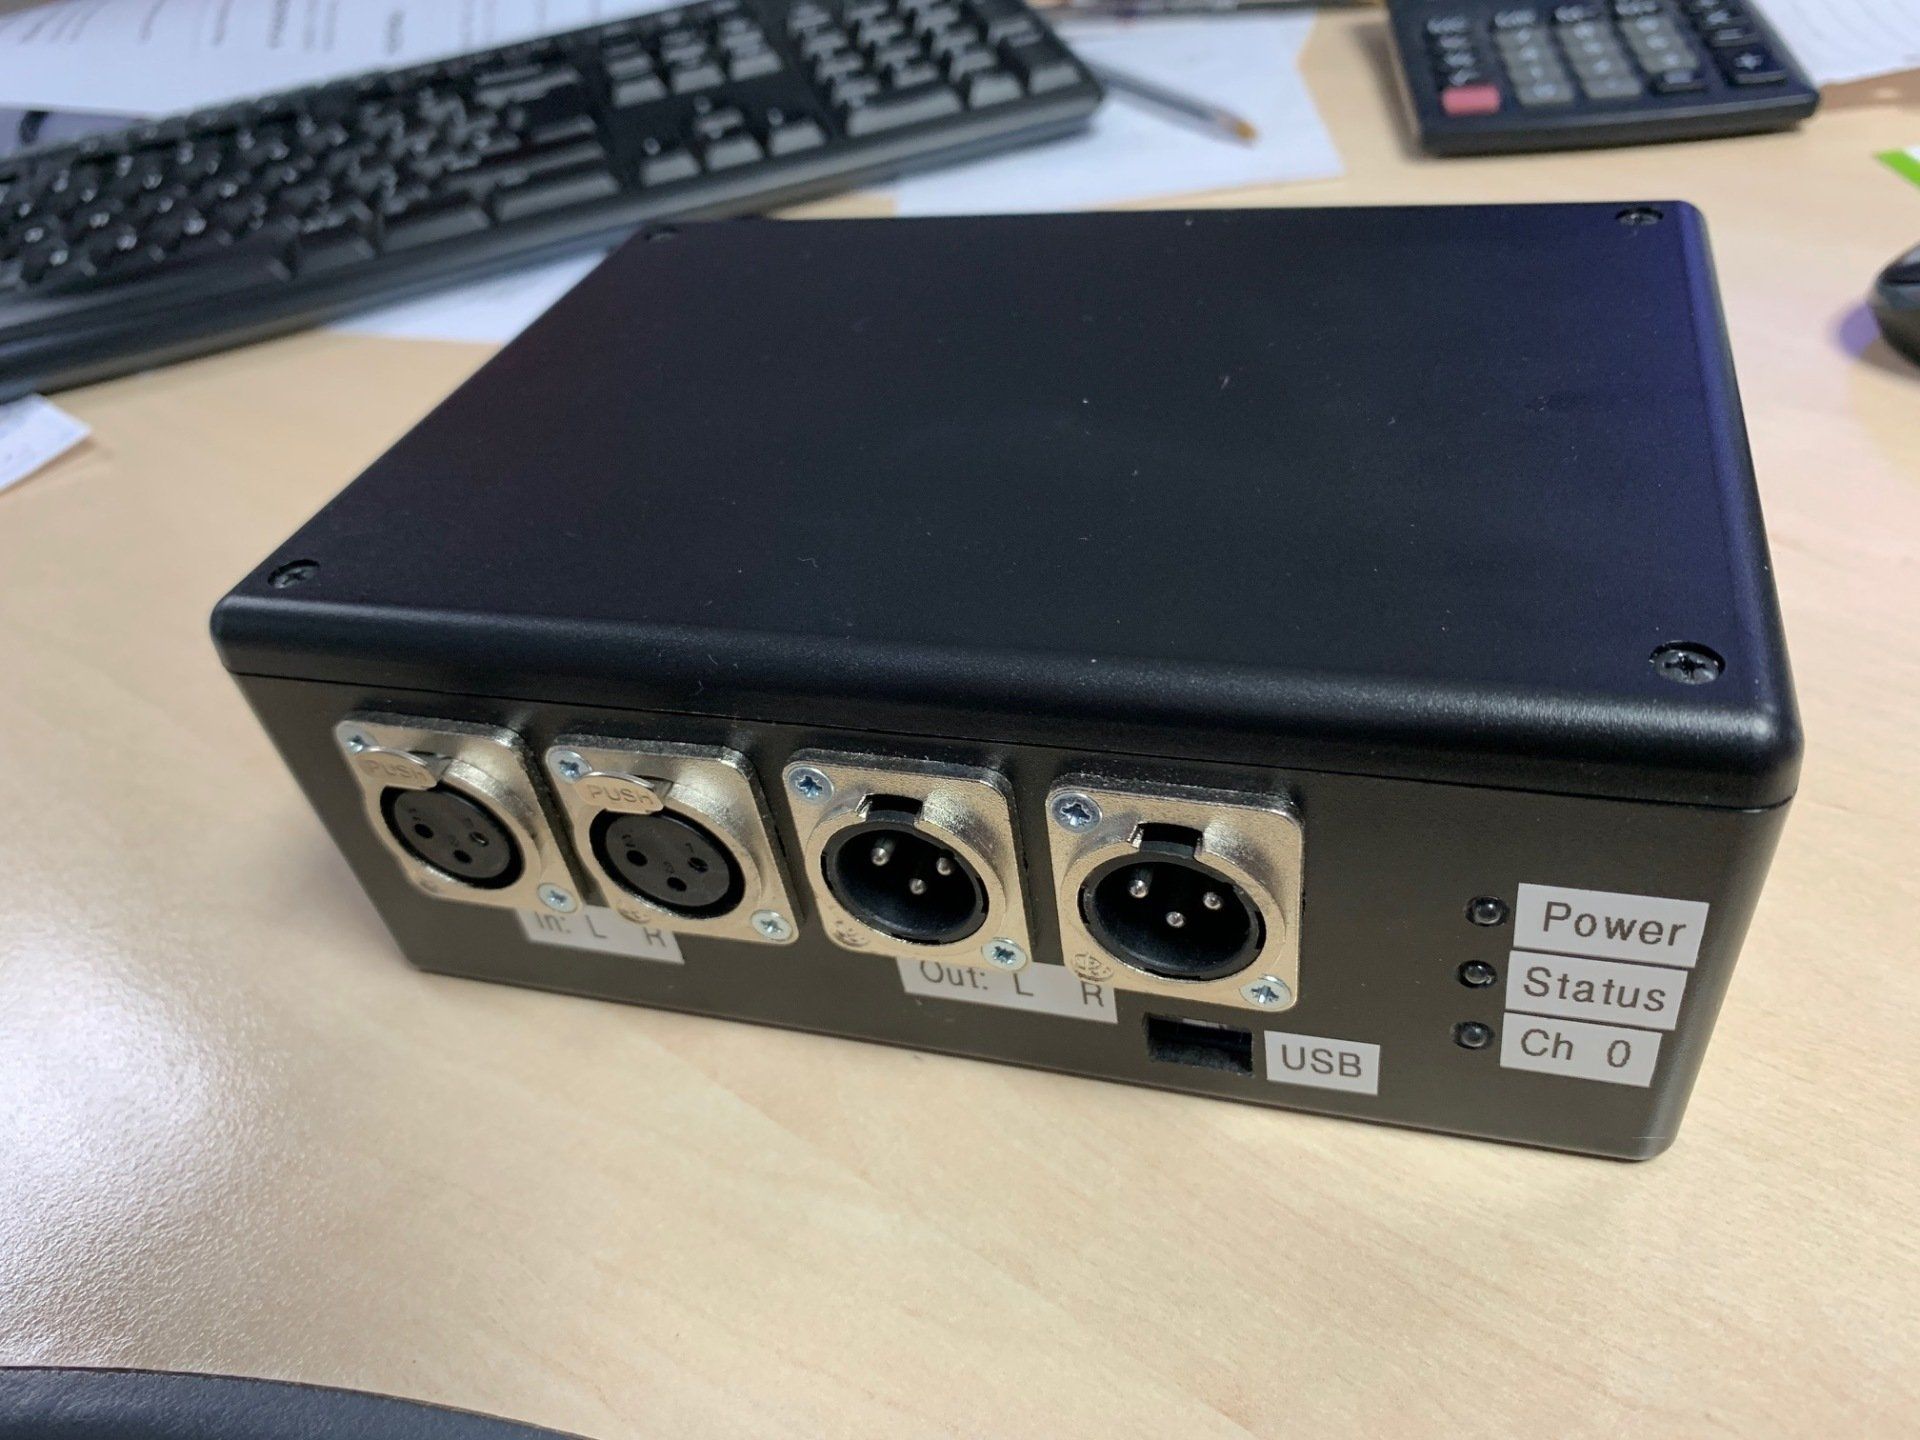
In this walkthough we will be using a Simple Audio Switcher
which can be purchased from our website. This is about the simplest device you available. Once the drivers are installed and the device is plugged in, it will appear as 'Serial Device' in the hardware manager. Download Driver Here>
Whichever hardware device you plan to use should be plugged in or installed prior to configuring your Broadcast Radio Hardware Service. Make sure you are on the latest drivers for devices that require them.
2. Install The Broadcast Radio Hardware Service
The first thing to do is download the latest version of the Broadcast Radio Hardware Service for installation on the PC that you want to run the Hardware Service on.
Head to https://www.broadcastradio.com/myriad-5-playout-support#Download

Once downloaded, run the installer and follow the normal setup process.

3. Configuring Your Hardware Service To Use Hardware I/O Devices
The Broadcast Radio Hardware Service (we will just call it the Hardware Service from now on) actually consists of three components.
- The Hardware Service - This is a service that runs in the background and does all the hard work.
- Hardware Configuration Utility - Used to configure the Hardware Service
- Hardware Monitor - Allows you to review and manually switch hardware lines once they are configured
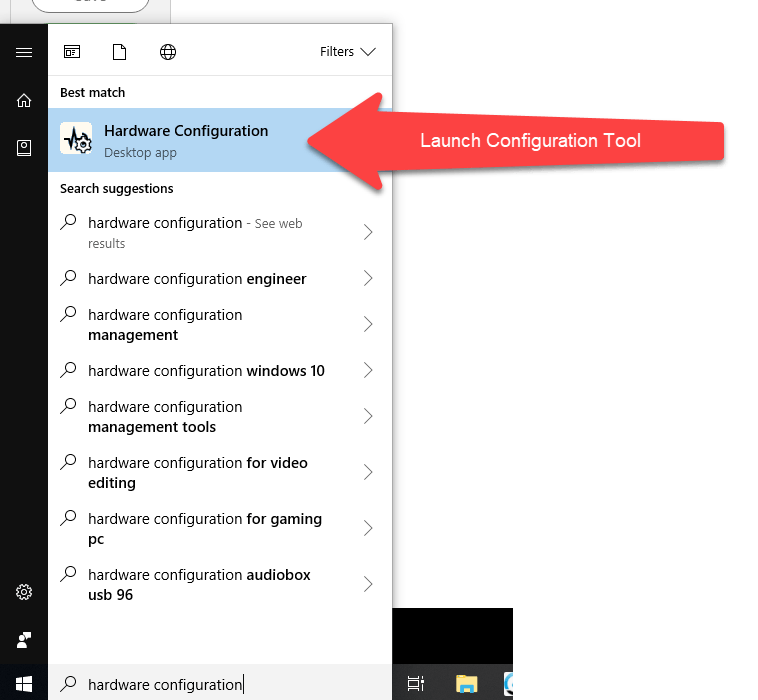
Click on the Start button on the taskbar and type in Hardware Configuration .
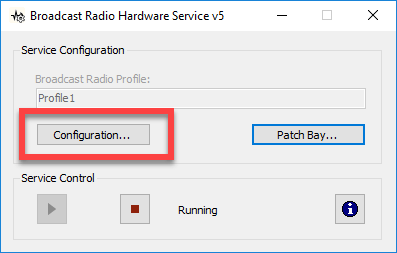
Next you need to click on the Configuration
button to access the Hardware Service Configuration screen.
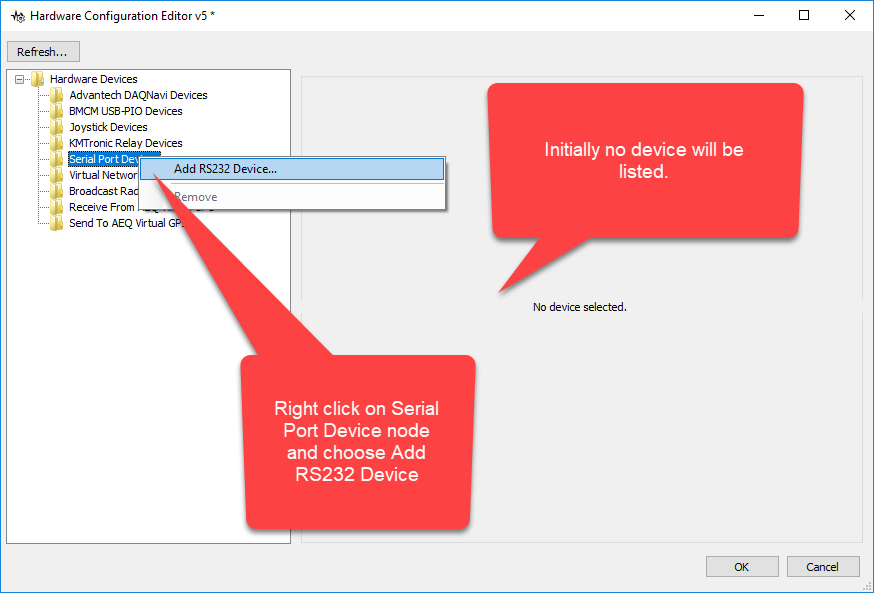
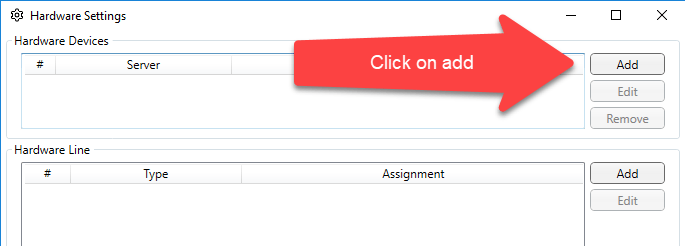
This will open the Config window which is used to add in Hardware Devices and configure the individual lines on each device. The Hardware Manager can handle multiple hardware devices simultaneously if required.
Right click on the Serial Port Device node on the left hand tree and select Add RS232 Device.
Next you need to set the options for the device. In this example we are using a Simple Audio Switcher which can be used to switch either two mono sources or one stereo source. We want to switch a stereo source so we have setup the first output line (5) to be the News Left audio channel and the next line (6) to for the right channel.
We have also given it a more obvious name and and checked the COM port is correct.

Other Hardware Devices will have different settings available in this window depending on how they connect and whether they are input/output devices or just output devices.
Click on the OK button to save and close this window.
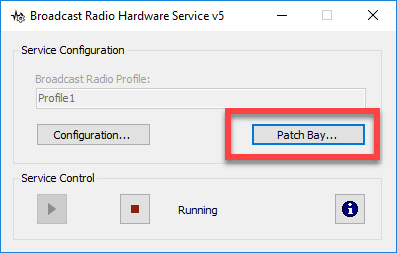
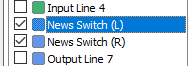
We are nearly done with this first phase but you pay remember that when we setup the output lines on the Simple Audio Switcher device, we had left and right audio channels controlled by separate hardware lines. We could just switch both of these but it would mean more Hardware events in the Log, instead we can use the Patch Bay feature in the Hardware Service to connect the hardware lines together. Click on the Patch Bay button.
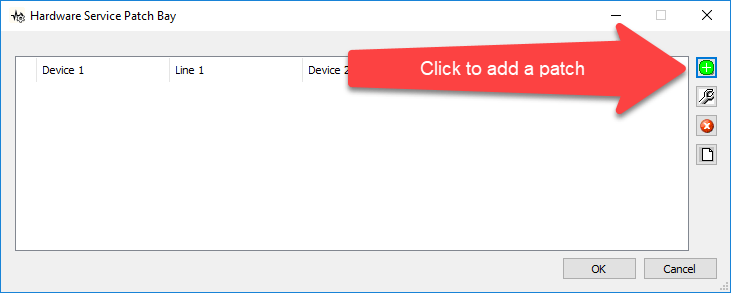
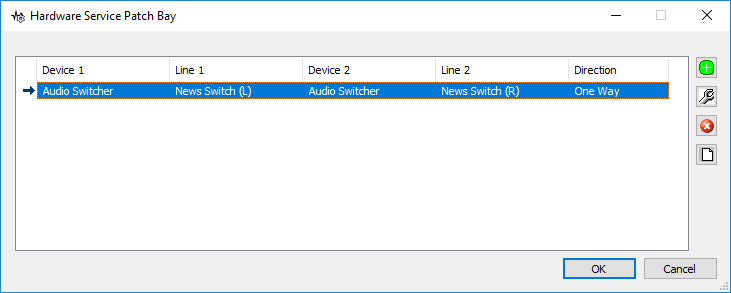
On the Patch Bay window you can add in a source device and hardware line as well as a destination device and hardware line (plus a direction). When the source hardware line changes state, the destination will change state to match so in this case we can set a patch that locks the 'left' and 'right' hardware lines together and then just switch the 'left' one in Myriad Playout.

You can add as many patches as you need to link Hardware lines across devices or even sites!
Your Hardware Service should be setup now and it should pickup all the changes but to be sure, it is worth stopping and restarting the service to ensure it has picked up your new devices.
Checking It Is All Working
At this stage your Hardware Service should be fully configured and running but it is worth checking all is ok. You can easily do this using the Hardware Service Monitoring application.
Click on the Start button on your task bar and type in Hardware Monitor
and then click on the application shortcut.

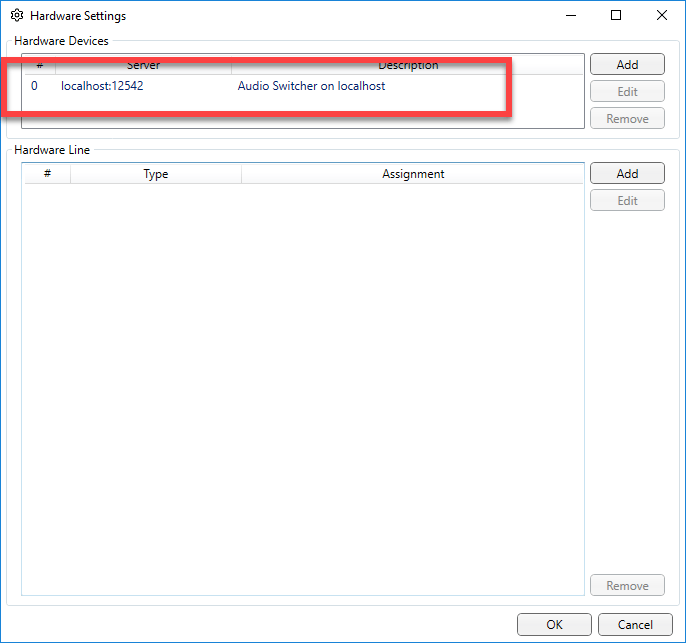
The Hardware Monitor will be displayed. If yours appears empty when you first load it, click on the Refresh icon on the top left to reload the available devices.
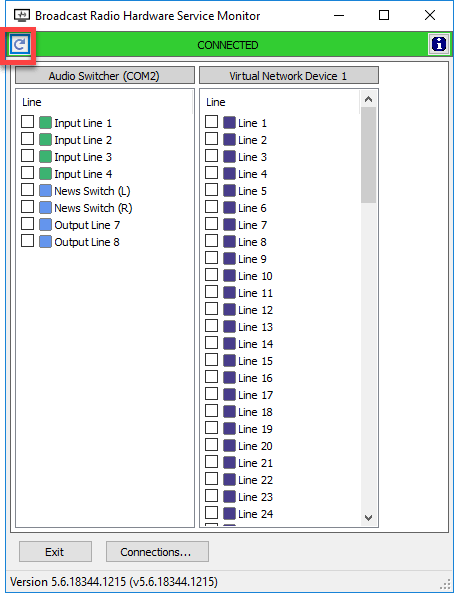
In the image above you can see the two Hardware Devices we have looked at so far. Each Hardware Line is represented in the Monitor with a 'tick box' representing the current state of the line. You can also test hardware lines by manually clicking on the appropriate box.
You can use this to test your Hardware Devices.
4. Configure Myriad To Use The Hardware Service
Now that the Hardware Service is setup and running, all we need to do is add the information Myriad Playout to allow it to connect and switch Hardware Lines.
Before you start, make sure you are on the latest version of Myriad Playout (v5.16 or higher).
Click on the Settings Menu > Hardware Setting.

On the Hardware Settings window click on the Add
button to add in a new Hardware Service.
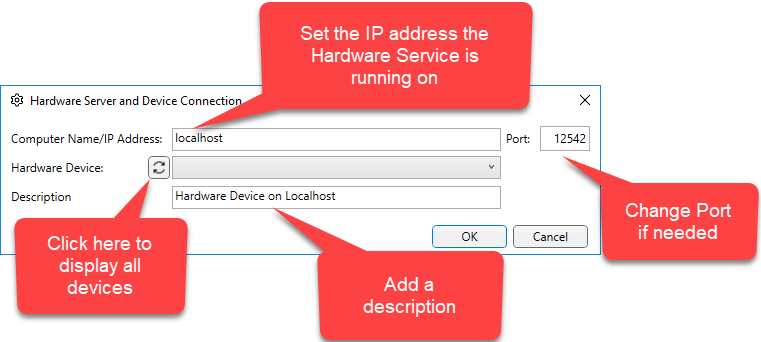
Once the Device Connection window appears, set the IP address for the PC that is running the Hardware Service (you can use localhost or 127.0.0.1 if it is on the same PC). You can also set the Port if you have changed the default on the Hardware Service.
The Hardware Device
list will initially be empty. Click on the Refresh
button to see a full list of available Devices.

Finally add a description and click on OK.
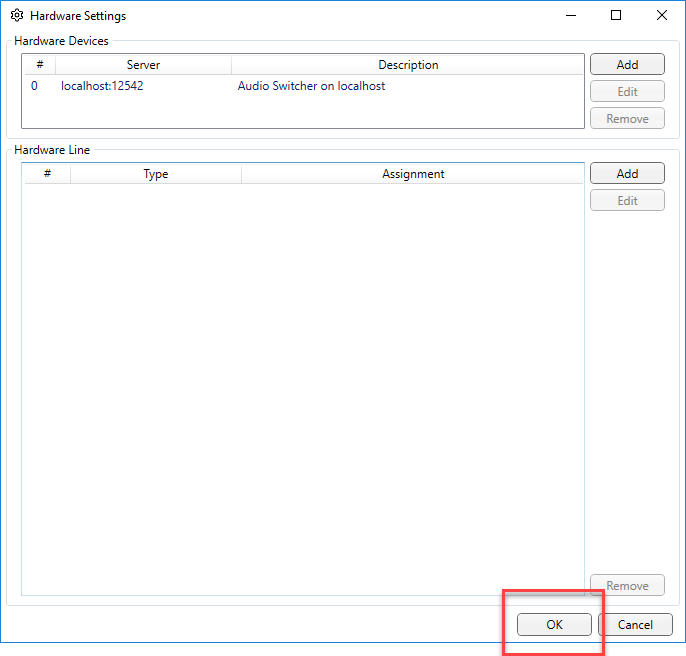
The lower section of this window is used to setup how Myriad will react to hardware inputs. You can use it to trigger all sorts of things in Myriad such as playing Media Players, switching On Air status or triggering Favourites. Click the Add button to explore the options available.
N.B. if you have only just added the Hardware Device in the top section, you will need to close and reopen this window in order for it to be populated.

But in this example we are not planning on adding any Input actions so instead we will focus purely on setting an output to switch the news on and off.
This means that we do not have to add anything to the bottom section at all and we can click on OK to close the window.
5. Adding A Hardware Line To The Log In Myriad Playout
Now all we need to do is add a Hardware Event to the Log in Myraid Playout.
Right click on the Log and select Insert Item > Hardware.

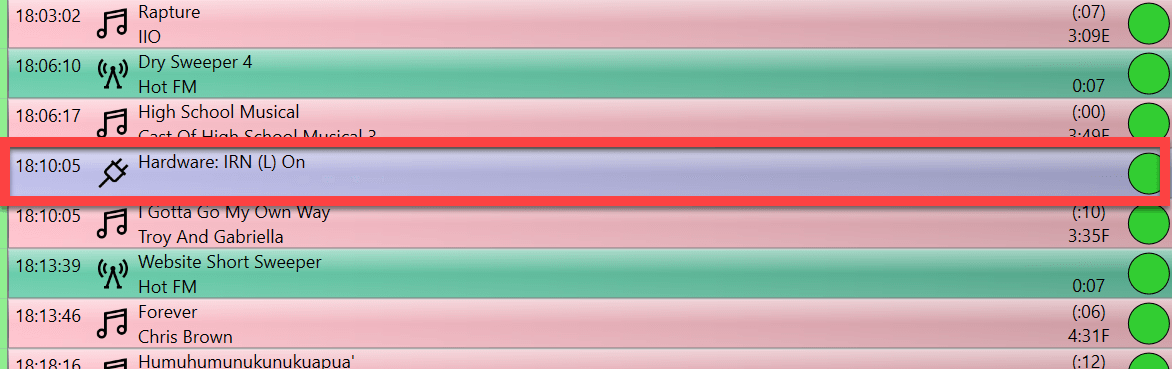
Next set the Hardware Device, Line and State that you want Myriad to set.

As you can see, the above Hardware Event will switch on Output 5 on the Audio Switcher which will turn on the news!

All done!